Roof Flashing Explained: Types, Purpose, and Common Leak Causes
A complete guide to roof flashing, covering the six types found on residential roofs, why each one exists, and the specific failure patterns that cause leaks at joints and transitions.
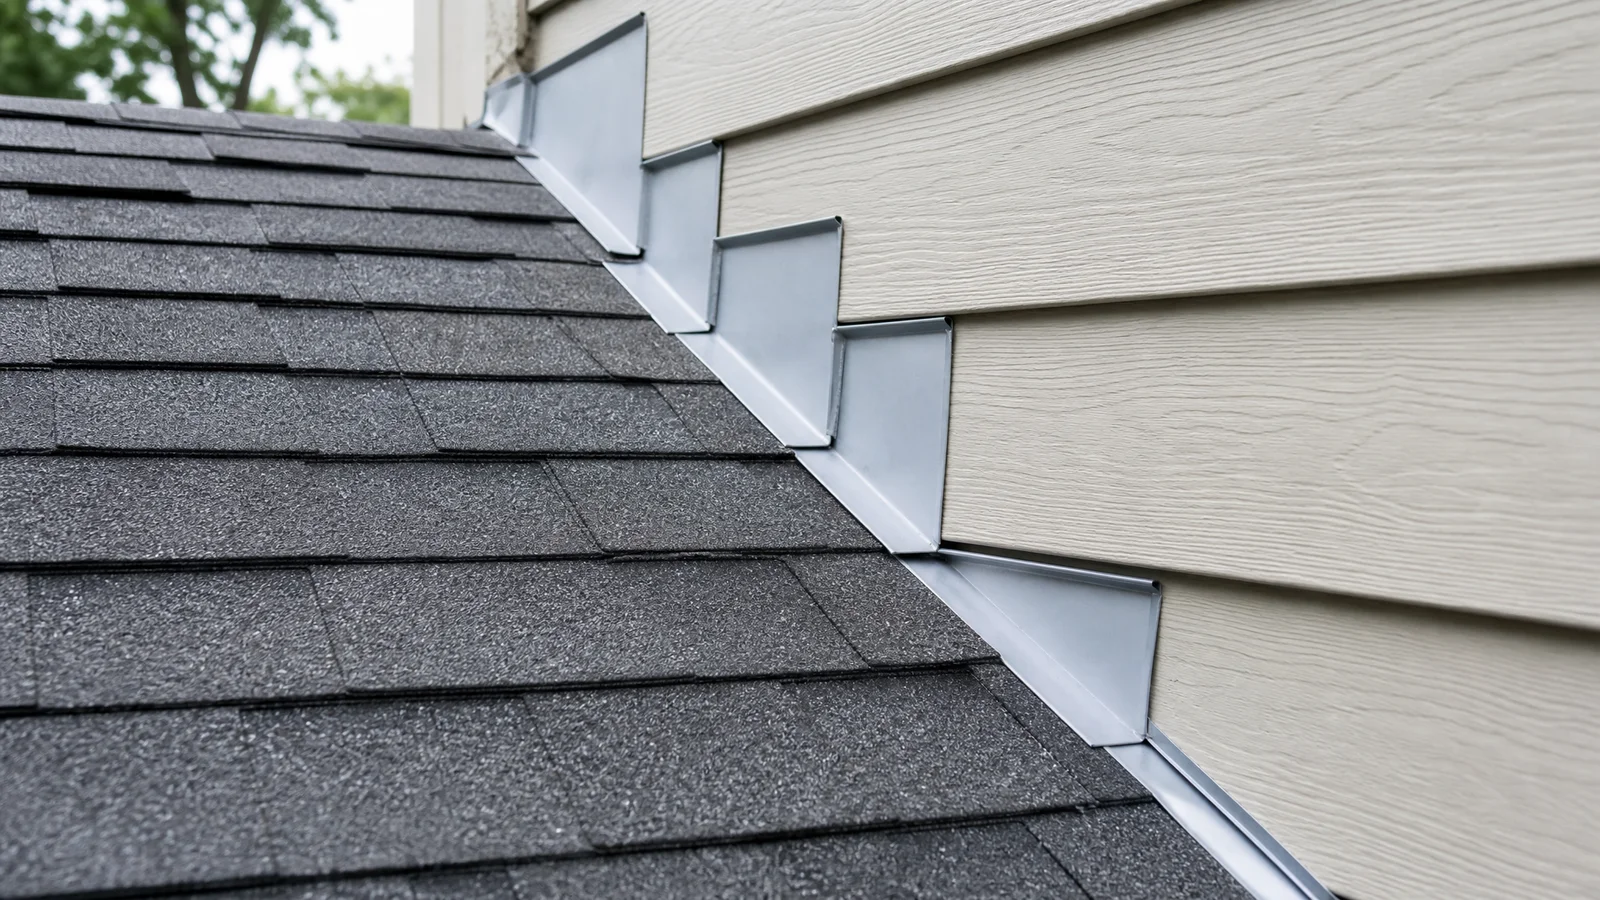
After heavy rain, a brown stain appears on a bedroom ceiling. The shingles look fine from the ground. A roofer climbs up, pulls back a few shingle courses near the chimney, and finds the real problem: a thin strip of metal that has pulled away from the masonry, leaving a gap just wide enough for water to slip through. That strip of metal is called flashing, and it is responsible for more residential roof leaks than any other single component.
This guide defines what flashing is, covers every type installed on a typical home, and explains the specific reasons it fails over time.
Defining Roof Flashing
Flashing is sheet metal installed at every point where a roof surface meets a wall, chimney, skylight, vent pipe, dormer, or another roof plane. Its purpose is simple: bridge the gap between two dissimilar materials and channel water away from the seam rather than letting it pool or penetrate.
The metal must be thin enough to bend into tight angles yet rigid enough to hold its shape through decades of thermal cycling. The 2024 International Residential Code (IRC) requires a minimum of 26-gauge thickness (0.019 inches) for corrosion resistance. Common materials include aluminum, galvanized steel, copper, and lead-coated copper.
Without flashing, every roof transition would be sealed with caulk alone. That approach fails within a year or two, which is why building codes mandate mechanical metal barriers at all critical junctions.
Six Types Found on Residential Roofs
Each flashing type is designed for a specific location and water management challenge. Here is a breakdown of all six:
- Step flashing: Individual L-shaped metal pieces, each roughly 4 by 5 inches, woven into the shingle courses as they travel up a wall or chimney face. Every shingle gets its own piece, creating a stair-step pattern that sheds water at each course.
- Counter flashing: A continuous or segmented cover piece that overlaps the step flashing from above. On chimneys, counter flashing is embedded into mortar joints or a cut reglet so it stays anchored independently of the roof surface.
- Apron (base) flashing: A single horizontal piece installed at the lowest point where a roof meets a chimney, dormer, or wall. It catches water before it can pool against the vertical surface.
- Valley flashing: A long metal channel running down the crease where two sloping roof planes converge. Valleys concentrate heavy water volume, so this flashing takes more abuse than any other type.
- Drip edge: Metal strips along the eaves and rakes that direct water cleanly off the roof edge and into gutters. IRC Section R905.2.8.5 mandates drip edge installation to resist wind uplift.
- Kick-out (diverter) flashing: A small angled piece at the bottom of a roof-to-wall junction that redirects water into the gutter instead of letting it pour behind siding. Missing kick-outs are one of the most common installation oversights on homes built before the mid-2000s.
How Flashing Protects West Hartford Homes
The housing stock across West Hartford presents specific challenges that make properly installed flashing critical. Colonials and Tudors from the 1920s through 1960s feature steep roof pitches, multiple dormers, and brick chimneys with decorative offsets. Each of those details creates another transition that requires flashing.
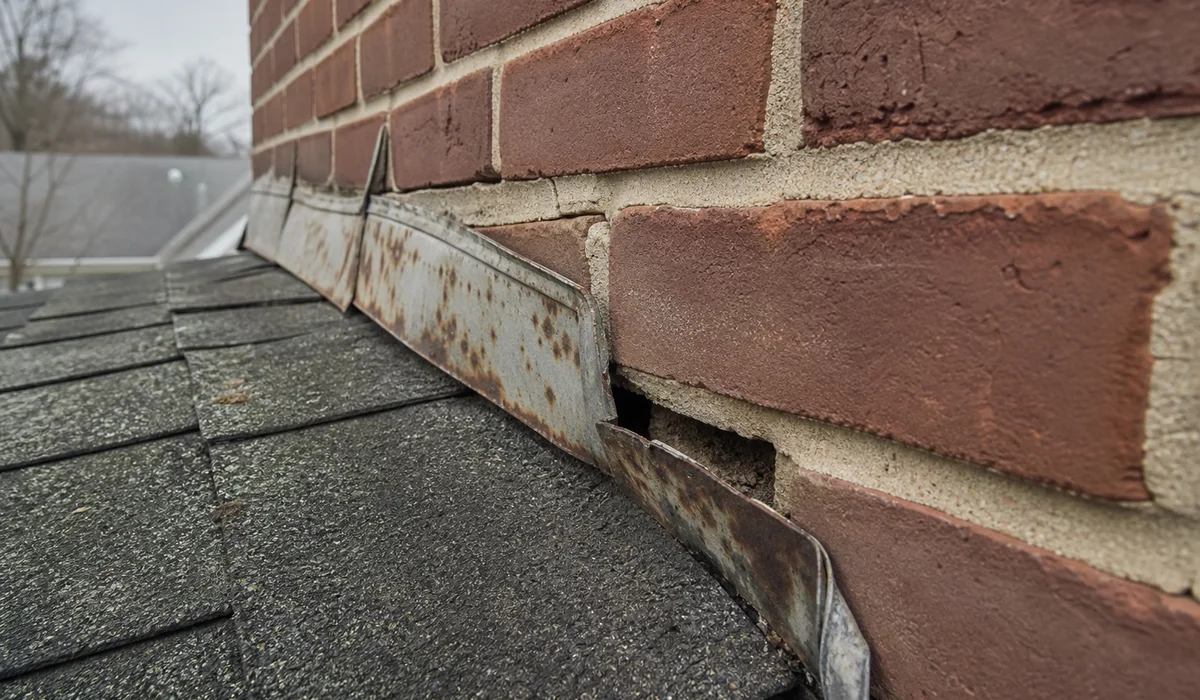
Connecticut’s freeze-thaw cycles add mechanical stress that milder climates never impose. Metal expands as summer temperatures push past 85 degrees, then contracts when winter drops well below freezing. Over 20 or 30 years, that repeated movement works fasteners loose, cracks sealant, and gradually separates metal from the surfaces it is supposed to protect.
Annual snowfall between 38 and 52 inches also creates ice dam conditions. When backed-up ice forms at roof edges and around chimneys, standing water pushes under flashing edges that would otherwise shed flowing water without issue.
Five Reasons Flashing Fails
Flashing does not fail randomly. Each leak traces back to one of these five causes:
1. Thermal expansion mismatch. Metal, shingles, wood, and masonry all expand at different rates. Copper expands roughly seven times more than silicone per degree Celsius. Over thousands of temperature cycles, the materials slowly pull apart from each other.
2. Sealant degradation. Roofing cement, polyurethane, and silicone caulks crack and shrink under prolonged UV exposure. Within three to five years in direct sun, sealed joints can open enough for water to pass through.
3. Fastener back-out. Nails and screws slowly withdraw from roof decking as the wood beneath them swells and shrinks with moisture changes. Once a fastener lifts even a fraction of an inch, the metal it was holding shifts out of position.
4. Corrosion and rust. Galvanized steel coatings erode after 15 to 30 years of exposure. Once bare steel is exposed, rust spreads quickly, especially in areas where leaves and debris trap moisture against the surface.
5. Original installation errors. Step flashing pieces that skip courses, counter flashing glued with caulk instead of mechanically embedded, and apron pieces cut too short never improve with age. Poor workmanship is the only failure mode that shows up in the first few years.
Where Failures Show Up First
West Hartford Roofing prioritizes these locations during inspections because they account for the vast majority of flashing-related leaks:
- Chimney intersections require four coordinated components: step flashing on the sides, counter flashing over those steps, an apron at the base, and a cricket or saddle on the uphill face. A missing cricket is one of the most frequent findings on older homes in neighborhoods like Elmwood and Bishops Corner.
- Dormers and additions settle independently from the main structure, slowly pulling step flashing away from siding or stucco.
- Skylight frames rely on factory gaskets that degrade faster than the surrounding roof material.
- Valleys on closed-cut designs wear through more quickly than open metal valleys because trapped debris holds moisture against the shingle edges.
- Kick-out locations without diverter flashing concentrate water directly into exterior wall cavities, causing hidden rot that can progress for years without visible symptoms.
Repair Versus Replacement Guidelines
Not every flashing problem requires a full tear-out. The right response depends on the condition found during inspection.
- Replace when rust has perforated the metal, when the flashing has permanently deformed from ice or wind pressure, or when the same joint has leaked repeatedly despite prior patches.
- Spot repair when a minor edge lift is the only issue and the metal shows no corrosion. A proper re-seal with roofing sealant can extend the life of otherwise sound flashing.
- Always replace during a full roof tear-off. Installing new shingles over old flashing creates a lifespan mismatch that guarantees a leak before the new shingles reach mid-life.
Typical flashing repairs range from $200 to $600. A full chimney flashing system with step, counter, apron, and cricket runs $800 to $1,500 depending on chimney size and accessibility. Compared to a premature roof replacement costing $10,000 or more, addressing flashing problems early is one of the best returns on any roofing maintenance dollar.
See our flashing and chimney repair service for details on the process, or request an assessment to schedule a professional evaluation of your roof transitions.
Frequently Asked Questions
How long does roof flashing last before it needs replacement? ▼
Aluminum and galvanized steel flashing typically last 20 to 30 years. Copper can exceed 50 years in favorable conditions. The sealants used alongside flashing often fail sooner, so joint inspections every five to seven years help catch problems before water gets through.
Can roof flashing be repaired without replacing the shingles? ▼
In many cases, yes. Step flashing along a wall or chimney can be accessed by carefully lifting surrounding shingle courses. However, valley flashing replacement usually requires removing shingles across the full valley length. A professional assessment determines the least invasive approach.
What is the difference between step and counter flashing? ▼
Step flashing consists of individual L-shaped pieces that interlock with each shingle course and turn up against a wall or chimney. Counter flashing overlaps from above, sealed into a mortar joint or tucked behind siding. Both layers must work together to keep water out of the transition.
Ready to talk to a roofer?
Read about our flashing & chimney leak repair service or get a free estimate.